Integrating jQuery Datatables in ASP.NET Core 7 MVC with Popup CRUD Operations

Prerequisites:
- Knowledge of Jquery Datatables Plugin
- Knowledge of Bootstrap5 Modal.
- Knowledge of Loading Page on Bootstrap Modal.
- Knowledge of ASP.NET Core MVC.
- Knowledge of ASP.NET Core Entity Framework Database First Approach.
- Knowledge of HTML.
- Knowledge of JavaScript.
- Knowledge of Bootstrap5.
- Knowledge of JQuery.
- Knowledge of C# Programming.
Get Code!
2) To connect the project with SQL server database, following list of packages are required to be installed using nuget package manager in the below listed order i.e.
- Microsoft.EntityFrameworkCore.SqlServer
- Microsoft.EntityFrameworkCore.Tools
- Microsoft.EntityFrameworkCore.Design
You also need to install 'Newtonsoft.Json' package if it is not already installed in your project.


3) Build the project and make sure that there is no errors in the build at this stage.
4) Now, next step is to design the database with the require tables and store procedures and add some sample data in it using Microsoft SQL Server. I have created a database design with a simple customer table with some sample data and relevant store procedures to support the CRUD operations for data listing, insert, update, delete and view.
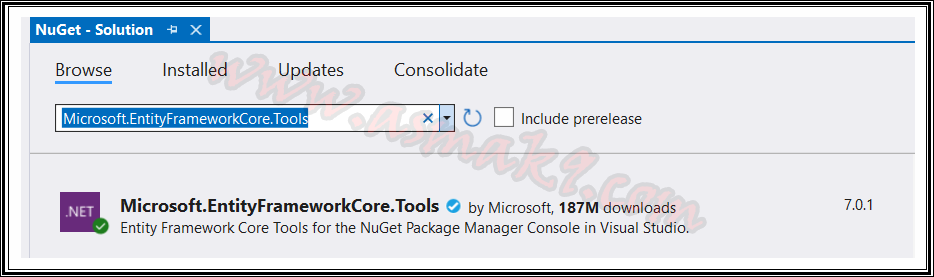
5) After creating the targeted database, now is the good time to connect the SQL server database with asp.net core 7 mvc project using entity framework database first approach. To do this as per asp.net core rules, a DbContext class needs to be created, which will be the data access layer for the application. To generate the DbContext file according to the targeted SQL server database, open the Tools -> NuGet Package Manager -> Package Manager Console as shown below i.e.


6) Now, I will use "Scaffold-DbContext" command to generate the require DbContext file. There are two ways you can use the Scaffold-DbContext command to generate the require DbContext file i.e.
- Directly using SQL connection string with the command.
- Define SQL connection string within appsettings.json file.
1. Directly using SQL connection string within the command.
Type the below command inside Package Manager Console window by directly using SQL connection string within Scaffold-DbContext command, make sure that you update the below command with your SQL server credentials i.e.
Scaffold-DbContext "Server=SQL_SERVER_NAME;Database=SQL_DATABASE_NAME;user id=SQL_USERNAME;password=SQL_PASSWORD;Trusted_Connection=True;TrustServerCertificate=True;" Microsoft.EntityFrameworkCore.SqlServer -OutputDir Models/DB

2. Define SQL connection string within appsettings.json file.
First define the SQL server connection string within "appsettings.json" file and then type the below Scaffold-DbContext command inside Package Manager Console window to generate the DbContext file. Make sure that you have updated the SQL server connection string within the appsettings.json file with your SQL server credentials and update the below command connection string name with your appsettings.json file i.e.

Scaffold-DbContext "Name=ConnectionStrings:YOUR_CONNECTION_STRING_NAME" Microsoft.EntityFrameworkCore.SqlServer -OutputDir Models/DB

7) The targeted DbContext file has been generated as shown below. Now update the DbContext file to incorporate the store procedures calls and also create the targeted custom object mapper classes for your select type store procedures. Here you need to make sure that the custom object mapper properties that you are creating must exactly match the fields defined in the database store procedure along with the data type. If in case you are generating an integer value dynamically which is not part of the table then its type must be set to long instead of integer within your object mapper property.

8) Now, register the created DbContext file as service within asp.net core platform, so, that by using the dependency injection design pattern the database layer can be accessed within the controllers. To do this open "Program.cs" file, notice in .NET Core 7, there is no Startup.cs file available because it's content has been merged together within the Program.cs file, so, all services are now registered within Program.cs file. So, paste below line of code to register the generated DbContext as service i.e.
...

// [Asma Khalid]: Register SQL database configuration context as services.
builder.Services.AddDbContext<DbCoreDatatablesContext>(options => options.UseSqlServer(builder.Configuration.GetConnectionString("YOUR_CONNECTION_STRING_NAME")));

...
In the above command, make sure to use the connection string name that you have defined within appsettings.json file.
9) Now, for accessing the database layer services with the help of dependency injection design pattern, first create a private property of the DbContext database type and then create the overload constructor with DbContext database as passing variable within "Controllers -> HomeController.cs" file as shown in the below lines of code i.e.
...

/// <summary>
/// Database Manager property.
/// </summary>
private readonly DbCoreDatatablesContext databaseManager;

...

/// <summary>
/// Initializes a new instance of the <see cref="HomeController"/> class.
/// </summary>
/// <param name="databaseManagerContext">Database manager context parameter</param>
public HomeController(DbCoreDatatablesContext databaseManagerContext)
{
    try
    {
        // Settings.
        this.databaseManager = databaseManagerContext;
    }
    catch (Exception ex)
    {
        // Info
        Console.Write(ex);
    }
}

...
10) Next, create a suitable default layout for your project and include
relevant JavaScripts and CSS styles libraries references. I am using
Jquery Datatables plugin for bootstrap 5 framework along with my
customize JavaScript & Style files. Make sure to add references of
all the necessary script and style files in your layout as needed.
11) To use Ajax form in asp.net core 7 MVC install below package from nuget package manager i.e.
- AspNetCore.Unobtrusive.Ajax

12) To incorporate the reference of the "AspNetCore.Unobtrusive.Ajax" package, first register this package as a service in the "Program.cs" file by adding the below lines of code i.e.
...

// [Asma Khalid]: Register Unobtrusive Ajax services.
builder.Services.AddUnobtrusiveAjax(useCdn: true, injectScriptIfNeeded: false);

...

// [Asma Khalid]: Register Unobtrusive Ajax services. It is required for serving 'jquery-unobtrusive-ajax.min.js' embedded script file.
app.UseUnobtrusiveAjax();

...
Then add this package references within the "_Layout.cshtml" file as shown in the below lines of code i.e.
...

<!-- Unotrusive Ajax Scripts -->
@Html.RenderUnobtrusiveAjaxScript()

...
13) In the next step, for popup style page, I have created two modal files "_ModalRemotePartial.cshtml" & "_ModalMsgPartial.cshtml". First modal is used to load Add, Edit, Delete and View pages and second modal is used to display any messages from server side like an alert. So, these two modals need to be referenced within the layout file. As shown in the below lines of code i.e.
...

<!-- Modal -->
@await Html.PartialAsync(SpecialPaths.MODAL_REMOTE_PARTIAL_PAGE_PATH)
@await Html.PartialAsync(SpecialPaths.MODAL_MSG_PARTIAL_PAGE_PATH)

...
14) Now, in the next step, design the "Views -> Home -> Index.cshtml" page file. In my case, I have design the page to display a page title, add button and a "Views -> Home -> _ViewListPartial.cshtml" partial page file containing the Jquery Datatable plugin data list. As shown below i.e.

I am using a simple server-side processing of Jquery Datatables plugin. The key change in the plugin configuration is that I have added my customize loader instead of using plugin's default loader. So, add the below lines of code within the "wwroot -> js -> script-custom-datatables.js" scrip file inside the plugin configurations i.e.
...

"language":
{
   "processing": "<div class='overlay custom-loader-background'><i class='fa fa-cog fa-spin custom-loader-color'></i></div>"
},

...
When you add above lines of code within the jquery datatables plugin configurations, the loader will look something like this i.e.

You can notice the issue here that my customize loader is placed on top of the plugin's default's loader which is incorrect design. So, to remove the plugin's default loader, add below lines of code within the "wwroot -> css -> style-custom-datatables.css" style file i.e.
...

div.dataTables_processing > div:last-child
{
    display: none !important;
}

...
The loader will now look correct as shown below i.e.
Another important thing is that with asp.net core 7 mvc platform, the json key data is only accepted in camel-case notation. So, if let say your server-side object mapper contains key variable name as "FirstName" and you use it exactly same within your JavaSctipt file then the JavaScriptot will not recognize this json key. So, you need to change it to camel-case notation i.e. "firstName". This change is also applicable to the jquery datatables plugin columns during configuration within the javascript file. So, make sure you have converted the column names in camel-case notation within the javascript.
The pagination, sorting and searching of Jquery Datatables plugin have been manged at server-side. As shown below i.e.


15) In the next step, design the "Views -> Home -> Add.cshtml" page file. In my case, I have include a page tile and a "Views -> Home -> _CRUDPartial.cshtml" partial page file containing a form which will process the add, update and view action perfom by the end-user. Since, I want my add page to be a popup page, therefore, in the "Controllers -> HomeController.cs" file HTTP Get action method "Add", change the return type to be a partial view with your attach model as shown in the below lines of code i.e.
...

// Info.
return this.PartialView(model);

...
For HTTP POST action method "Add". I am returning different JSON responses depend on the business logic. In the "Views -> Home -> _CRUDPartial.cshtml" partial page, I am using AJAX form helper tag as shown in the below lines of code i.e.
...

@using (Html.AjaxBeginForm(Model.ActionName, SpecialPaths.HOME_CONTROLLER, new AjaxOptions { HttpMethod = "POST", OnSuccess = "onActionSuccess" }, new { @id = "homeActionId", @class = "form-horizontal", role = "form" }))
{

   <!-- Form Elements -->

...

}

...
In the above code, AjaxOptions onSuccess method is defined within "wwroot -> js ->script-custom-forms.js" script file. So, whatever message response from server side is received when the form data is submitted, the response messages will be displayed as a popup alert whenever onSuccess method is processed. Make sure to include the form validation scripts available within "Views -> Shared -> _ValidationScriptsPartial.cshtml" file.
The form data is submitted via JavaScript method "AjaxHomeFormSubmit(...)" along with onSuccess method "onActionSuccess" which are available within "wwwroot -> js -> script-custom-forms.js" file. The "AjaxHomeFormSubmit(...)" method needs to be register as form event listener in order to prevent multiple calling issue of the form submit AJAX method. This registration needs to be done within "_ModalRemotePartial.cshtml" modal configuration method which is available within "wwwroot -> js -> script-custom-modal.js" script file as shown in the below lines of code i.e.
...

// Modal Click Load server content.
    $("#ModalRemoteBoxId").on("show.bs.modal", function (e)
{
     // Loading.
      var link = $(e.relatedTarget);

     // Loading.
     $(this).find(".modal-body").load(link.attr("href"), function ()
     {
          // Add Event listener to Home Form
          const homeForm = document.getElementById('homeActionId');
          homeForm.addEventListener('submit', AjaxHomeFormSubmit);
     });
});

...
To tie the entire add popup page together, In the index page's add button, include the below properties to enable the popup modal i.e.
...

data-bs-toggle="modal" data-bs-target="#ModalRemoteBoxId"

...
The add page will look as shown below i.e.

As the form validation is also enabled, so, in case of error the popup will look like as shown below i.e.

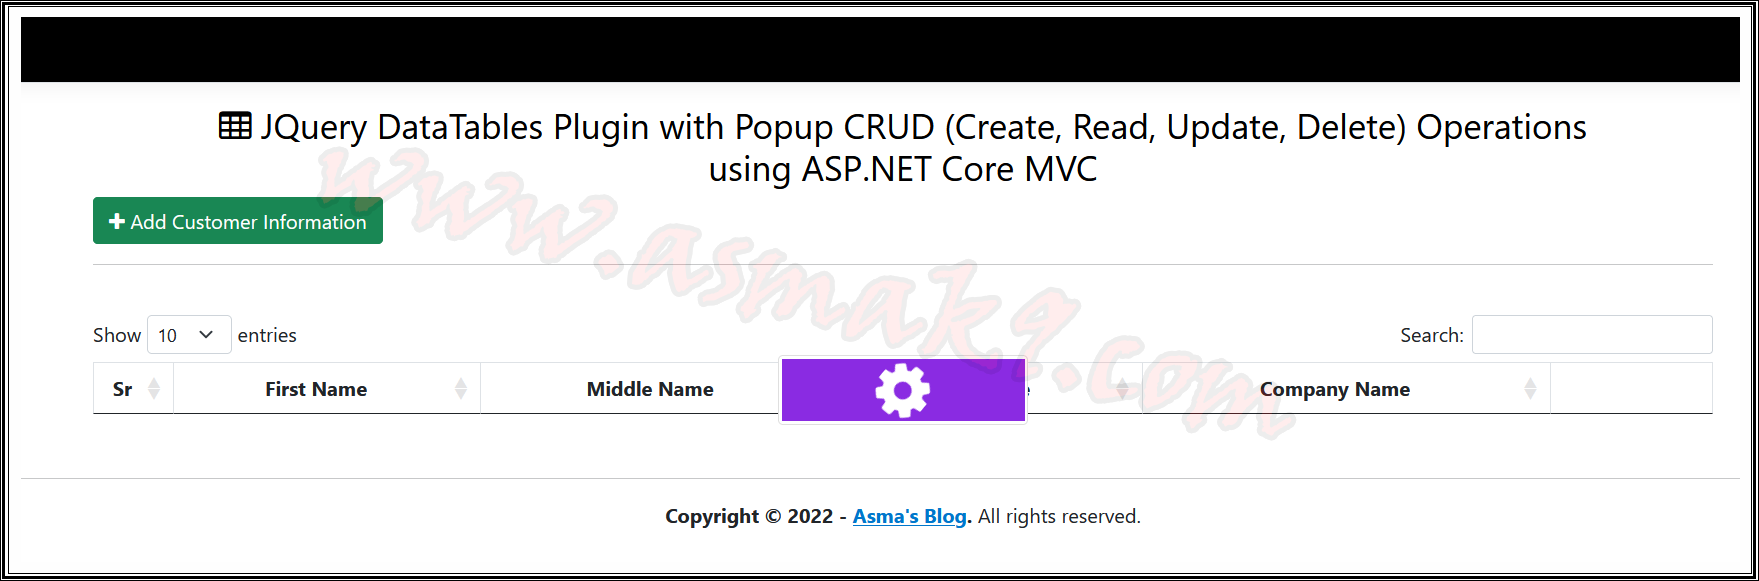
16) In the next step, create a menu button within the jquery datatable plugin data list in order to perform view, edit and delete actions. This menu can be created as dynamic HTML string at the plugin's configuration level or at the server-side level. I prefer creating the dynamic HTML string at server side. So, when loading my data list, all I have to do is mapped the dynamic HTML string into one of the object mapper property with the targeted customer IDs as shown in the below lines of code i.e.
...


Action = " <div class=\"btn-group\"> " +
              " <button type=\"button\" class=\"btn btn-danger dropdown-toggle custom-btn-settings\" data-bs-toggle=\"dropdown\" aria-expanded=\"false\"> " +
                   " <i class=\"fa fa-gear\"></i> " +
              " </button> " +
              " <ul class=\"dropdown-menu dropdown-menu-dark\"> " +
                    " <li><a href= \"" + obj.Url.Action(viewActionName, controllerName, new { CustomerId = p.customer_id }) + "\"  class=\"dropdown-item\" data-bs-toggle=\"modal\" data-bs-target=\"#ModalRemoteBoxId\" ><i class=\"fa fa-eye\"></i> <span>View</span></a></li> " +
                    " <li><hr class=\"dropdown-divider\"/></li> " +
                    " <li><a href= \"" + obj.Url.Action(editActionName, controllerName, new { CustomerId = p.customer_id }) + "\" class=\"dropdown-item\" data-bs-toggle=\"modal\" data-bs-target=\"#ModalRemoteBoxId\" ><i class=\"fa fa-edit\"></i> <span>Edit</span></a></li> " +
                    " <li><a href= \"JavaScript:{AjaxDeleteAction('" + obj.Url.Action(deleteActionName, controllerName, new { CustomerId = p.customer_id }) + "');}\"  class=\"dropdown-item\"><i class=\"fa fa-trash\"></i> <span>Delete</span></a></li> " +
              " </ul> " +
         " </div> "

...
In the above code, notice that view and edit actions will be displayed as popup modal and delete action is processed with a JavaScript method available within "wwwroot -> js -> script-custom-forms.js" file. The reason is simple, delete action does not need a page. The menu on each entry of the jquery datatables plugin list will look as shown below i.e.

17) In the next step, create the view page in same manner as the add page. The only difference is in the HTTP GET "DetailView" action method logic and there is no HTTP POST action method and the page fields are non-editable. The view page will look as shown below i.e.

18) Next, create the edit page in same manner as the add page. The only difference is in the HTTP GET & HTTP POST "Edit" action methods logic. The edit page will look as shown below i.e.

19) Now, in the next step, create the HTTP POST delete action method in the controller with returning json message and business logic. Also create the related JavaScript method within "wwwroot -> js -> script-custom-forms.js" file. The delete popup will look as shown below i.e.

20) Now, when you execute your project, you will be able to perform the CRUD operations as page popup style and changes will also be reflected within the SQL server database as well as shown below i.e.


Conclusion
In this article, you will learn to integrate Jquery Ddatatables plugin with popup CRUD operations using ASP.NET Core 7 MVC platform. You will learn two methods to auto generate the DbContext file using the "Scaffold-DbContext" command and appsettings.js file. You will also learn about Ajax Form. You will learn to make pages as a popup page using bootstrap5 modals. You will learn to configure the default loader of the jquery datatables plugin. You will also learn to create a dynamic action menu for the jquery datatables plugin customize with dynamic relevant customer ID for each data list entry. You will also learn to create add, edit and view pages as partial popup modal pages. Finally, you will learn to create the delete action as a popup page action.
Related Articles
- How to Call Store Procedure using Entity Framework Core .NET 8
- How to Import/Export CSV File Data in ASP.NET Core Web Application
- How to Deploy ASP.NET Core Application on IIS in Self Contained Mode
- How to Install ASP.NET Core IIS Hosting Bundle
- Learn About ASP.NET Core 2: Architecture & Design Pattern Ideology
Video


